So, you’ve decided it’s time for your business to dive into the world of video. That’s great news!
But where do you start? If the thought of making a video feels as daunting as climbing Mount Everest without a guide, you’re not alone.
The good news? The foundation of making a video isn’t all that difficult.
Let’s break it down together.
Step 1: Understand the Purpose of Your Video
First things first—why are you making this video? I know, this seems like a simple question, but trust me, getting clear on your goals is one of the 2 key ingredients that you need for a good video. Are you looking to increase brand awareness, generate leads, or maybe educate your customers? Once you have that figured out, everything else will fall into place.
The second key ingredient: Your audience. Who are they? What do they care about? Understanding your target audience and what you want it to achieve is like having a roadmap for your video.
It’ll help you decide on the tone, style, and even the content of your video.
Pro Tip: You need to go beyond, “I want a video to show all the features of my product for everyone.” Your product or service is targeted at a specific customer, and some features are more critical for some than others. So really understanding what feature for which audience will increase the chance that your video will help your sales cycle.
Oh, and another reason why you want to know your audience now, is because different audiences “live” in different platforms. You want to make sure your video maximizes the chances of reaching them.
For example, trying to get the attention of 50 year olds on TikTok would probably not be the most effective. They are generally on YouTube, and on Google searching for things. They may not even be active on Facebook, so focusing your marketing strategy there may not be as effective.
So knowing your audience and your content will help you determine where you can most likely find your audience.
Okay, let’s stop here… In fact, don’t even go to Step 2 if you haven’t really understood and analysis this.
If you are stuck at this stage, getting a good business consultant, or Video Content Agency, who has an eye in marketing strategies, will help you do this effectively.
Step 2: Choose the Right Type of Video
Now that you know why you’re making a video and who it’s for, it’s time to decide on the type of video. Want to show off your happy customers? A testimonial video could work wonders. Need to showcase how your Customer’s problems were resolved with your product or service? Then a Case Study is the way to go.
Here are a few types to consider:
- Case Study Videos: Perfect for really showing off your product or service in action and its effect on real customers who have used it.
- Explainer Videos: It’s great for breaking down complicated products or services, and show how it solves different or specific problems your potential customers may have.
- Testimonial Videos: Let your satisfied customers do the talking.
- Product Demos: Highlight key features and benefits in action. You can show what it is like to use the product or service and answer questions that your potential customers may have about it.
- Brand Storytelling: Share your brand’s journey to create an emotional connection. It is a fantastic way to build brand awareness and credibility for your business.
None of these video types are mutually exclusive.
For example, a Case Study can include an explainer of a specific feature of your product, and show it in action with your happy customer using it.
Or, a Brand Storytelling video can also have testimonials from your previous customers who are happy to testify to your business culture and practices.
You probably also want to consider Animations verse Live-action videos. Each type of video has it’s complexities, and effectiveness.
As with Step 1, if you are not sure the best way to tell your story, engage a Video Content Agency to help you with that. They have creative script writers and creative directors who will look at your audience and goals and offer the most effect way of telling the story…. If they don’t find another video agency.
Step 3: Plan Your Content
Once you’ve settled on the type of video, it’s time to plan the content. This is where the magic starts. Begin with a script. Keep it clear, concise, and aligned with your brand voice. I know the idea of Brand Voice is rather abstract, and many businesses don’t have a brand voice at all.
So the idea here is that whatever your content or script is, make sure it is what you as the business or business owner really believes in and think of how you would say it if you were to be asked by a potential customer about the subject you are talking about.
Remember, your script doesn’t need to be shakespere, but it does need to get your message across in an authentic and clear way.
Next, consider storyboarding. I know, it might sound a bit “extra,” but trust me—it helps. A storyboard is like a visual blueprint of your video, giving you a clear picture of how each scene will play out. This can save you from a lot of headaches down the line.
What exactly is storyboarding? Well, it’s just a visual way to know what you want to see in your video at any point in your script.
This will help you know that what you are saying can been seen visually, or not, and to know if what you are saying is true of your product or service as well. For really simple “talking heads” videos, where you only see a person talking for the duration of the video, then you may skip this step; but again, it will be good for you to go through the process of thinking of where you want to film this video and what you want to see in the background as this person is talking.
Is it on the factory floor, in a nice lounge area, against a white background, or sitting in the middle of a wading pool…
Oh good, you are still reading… Ha ha…
Step 4: In-House or Professional Production?
Now, the big question: Should you produce the video in-house or hire professionals? If you’ve got the skills and equipment, in-house production can be a cost-effective option. But let’s be real—this route also demands a good chunk of time and resources.
Time and resources from your team that may be better placed in taking sales calls, or innovating products, or helping customers.
If your budget allows, hiring a Video Agency can elevate your video’s quality. They’ll bring expertise and equipment that can make your video shine. Weigh the pros and cons, and choose what’s best for your business.
If you had already hired an agency in Step 1 to 3, I would suggest to keep going on with them.
Step 5: Set a Realistic Budget
Speaking of budgets, let’s talk money. We have a really good break down of the costs that go into a video production. You can find it HERE.
I strongly recommend that you have a read of that blog when considering the next part of this one.
Video production can range from budget-friendly to bank-breaking, depending on what you’re aiming for. Break down your costs—consider everything from scriptwriting and filming to editing and music.
There may be things that you can do yourself, like say understanding your content and your audience, and scripting, and you can provide your own locations and talents to save some money.
Step 6: Filming Essentials
You’re ready to film! Whether you’re shooting with a smartphone or a professional camera, there are a few essentials to keep in mind. Good lighting is a MUST— ensure your subjects are well-lit to avoid unflattering shadows. Pay attention to the location and set design as well. The background should complement your message, not distract from it.
If you have decided to self film, invest in a good ring light and a couple of other soft lights to really give it a more polished look. There are plenty of videos on YouTube that show you how to set up the basic 2 or 3 point lighting to ensure that whoever is speaking is well light against the background.
But one of the most important thing, that is usually a let down in many self-filmed videos is the sound quality.
Even the most beautifully filmed video with bad sound is a massive distraction, and if your audience can’t hear what you are trying to say, then the video would have missed its mark, even before the audience has see the full video.
Again, if you are doing self filming, make sure to invest in a good set of microphones that can be attached to your phone or camera to give you the best quality. You really want to use Lavalier microphones so that the microphone will be as close to the speaker’s mouth as possible.
You can also hire a videographer to provide all these equipment and to shoot the video so that you don’t have to. Just hiring a Videographer can be a cost-effective way to make sure your video’s technical quality is good.
If you have already hired a video agency to produce the video for you, they will take care of all these details and technical issues for you.
Step 7: Post-Production Magic
We are close to the end! This is where you’ll edit your footage, add images, text, and music to polish up the video and to make sure all the content you want to share is clear and easy to understand.
Music and sound effects can add a lot to your video, because it builds up the whole sensory experience for the audience watching the video. So pay attention to how the video sounds just as much as how it looks.
Step 8: Distribution Strategy
I know I had already mentioned that you need to already know your audience and where they are spending their time in Step 1. In the post production step, you need to make sure that your video complies with the technical needs of the channel you want to share the video on.
For example, you should use Square videos of no longer then 1 minute if you want to “distribute” it on Instagram, whereas, you need it in Portrait format if you are going to put it on TikTok, or YouTube Shorts.
Oh and don’t forget about SEO. Use relevant keywords in your video titles, descriptions, and tags and most importantly, Caption files. This actually means that you would already want to make sure that your video script is build for SEO as well, so that the captions will be SEO friendly.
These captions should be prepared as an SRT file that you can upload to your platform so that the platform like YouTube does not need to, sometimes, badly autogenerate subtitles for you.
Pro Tip: It is also important that if you are using your video Social Media platforms like, Facebook, LinikedIn or TikTok, you should also have your captions “burnt into” the video, meaning the subtitles are always on the video.
This is because these platforms autoplay the videos with the audio turned off by default, and many users will read the subtitles for the video while they are scrolling through their feeds on a noisy bus, or in a location where they can’t turn on the sound. And in fact, many people read the first 3 – 6 seconds of subtitles to decide if they want to keep watching the video or not.
And to make things more complicated, placement of the burnt-in subtitles need to be different for different platforms because of the platform overlays on videos which might block the subtitles if you place it in the wrong spot.
This image below is an example for Facebook Ads. The highlighted yellow zones are where you shouldn’t place your captions. Which means that you need to make sure that whatever you want to show on screen does not get blocked by your captions. Which is why we mentioned in Step 2 to storyboard and consider how to film your video with these caption overlays in mind:
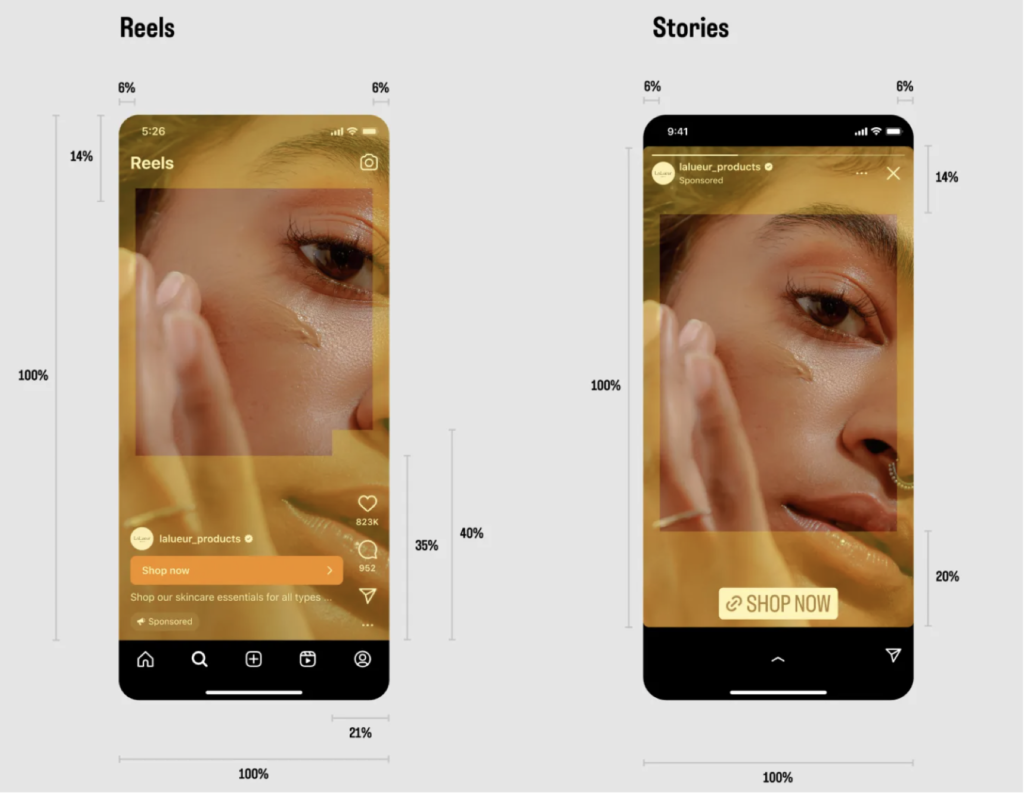
Remember every platform is a little different and you can find information for this online.
Step 9: Measure Success and Learn
After all that hard work, it’s essential to measure your video’s success. Keep an eye on metrics like views, engagement rates, and conversions. This data will tell you what’s working and what needs tweaking. Use these insights to improve future videos—learning and iterating is all part of the process.
I know not every video will need to be tracked in terms of conversions and sales, for example, a training video should be track in terms of view and completion rates rather than conversion rates.
However, it is also very important to note that videos do not operate by themselves to generate leads, or increase conversions. They need to be part of a marketing content strategy to really work, and work well.
So just putting your video on YouTube and hoping it goes viral is not a strategy, and unless you are very lucky, it won’t give you your Return on Investment.
Here is a story of a Gym Owner who uses videos effectively to shorten sales cycles and improve conversion rates. His videos have barely 500 views but they have helped him improve his business by over 300%
What is important here is that you need to track if your video is actually being viewed and for how long, and if it is part of an Ad campaign on, say Google, what is the Click Through Rate (CTR). That will give you an indication of whether the video is working for you, and if not, why.
There is a wealth of information that goes behind the data, and it can help you determine how to make your next video, or how to tweak your current one to improve the chance of people engaging with it.
Step 10: Let’s Be Realistic
Finally, let’s keep it real—your video might not win any awards, and that’s okay! Start small and build from there. Every video is a learning opportunity. The more you create, the more confident you’ll become in your skills and in understanding what resonates with your audience.
You need to be clear on what your goals are for each video as mentioned in Step 1. If you want to drive more traffic to your website, then track to see if it is working, and use that information to improve the next video.
Just remember that for every 1 “viral” video, there is about a million that are not. So don’t sweat it if your video has only a modest view rat. Find out why and improve on it.
Wrapping Up: Just Start
If there’s one thing I want you to take away from this, it’s that getting started is half the battle. Don’t let the fear of the unknown stop you from making a video. With a bit of planning, creativity, and persistence, you’ll be able to create videos that not only look great but also drive real results for your business.